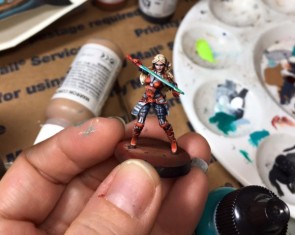
If you really love your dudes on a map, you will paint them. Well painted miniatures can vastly improve the look of a game and make it more immersive and impressive to look at on the table. Despite this, you don't see that many board games with painted miniatures. Why? Well, mostly because people don't understand how easy (and enjoyable) painting stuff is. People think it is physically difficult, expensive, and time consuming. Painting can be all of those things, but it doesn't have to be any of those things. This guide aims to show you how to paint miniatures cheap, fast and easy. I have tried to add a lot of detail to this guide, so that you don't need to do much added research, but not every step will be needed for every miniature. How much or how little you want to do is up to you.
Before I started, I viewed painting minis as a chore, but you know what? After I did a few, I started to enjoy it. You will see yourself getting better after just a few figures. There are few things in my life that don't involve sex or alcohol that I find as relaxing as painting miniatures. I love putting some music on and sitting down to paint. It is a great way to escape the ever present laptop or TV screen and requires minimal thinking, so it is great when you aren't in the mood to game. You will be surprised how good your results turn out, with a little pre-planning and some simple techniques.
1. Prep the miniatures
The first thing you want to do is get those miniatures ready to be painted. A lot of new painters skip this step and pay for it later. Even a well painted mini looks like crap if his sword is bent or if there is a big ass line down his back. Prepping involves three steps at the most basic level.
First is to clean the mini(s) of flash and mold lines. We've all seen the little line on a miniature where the mold that created it was. You can take an Xacto knife, or any sharp hobby knife, and carefully cut this extra material away. The technique is, you place the knife against the flat part of the mini and scrape the blade down the mini. The flash will come off before you start whittling away at the trooper's leg. While you are at it, look over the rest of the model for any other pieces of flash (a term for the extra plastic on a mini) and remove them with your Xacto. Some people prefer fine sandpaper, but that is only for the truly anal. Removing flash and mold lines with an Xacto is pretty easy.
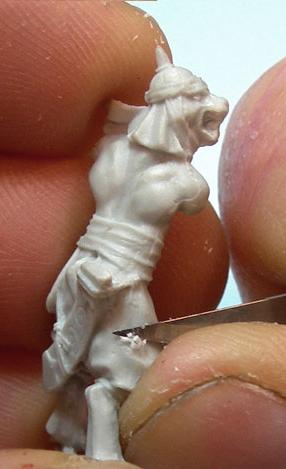
The second step is to straighten any bent parts of the model. There are several schools of thought on how to do this. I use a bag of salt, heated up in a nonstick pan on the stovetop, and submerge the miniatures in that to get them hot. Don't eat the salt afterward, just save it for the next time you do this. If I am doing one or two minis, I will stick them in microwaved hot water so I don't have to mess with the salt. The water isn't as good (or clean) as salt but I'm not going to the trouble of heating up the salt for two dudes.
If you break something, you can stick it back together with model superglue. My preferred brand is zap a gap, because it dries quickly and is designed for miniatures. There are several different brands available at craft stores and most game stores. DO NOT buy rubber cement or something like that.
The third prep step is to wash the miniatures in warm soapy water. This serves two purposes. First, new miniatures are coated with an invisible powder used at the factory to get them to release from the molds they were created in. This is basically a powder lubricant. As you would imagine, paint doesn't stick to it very well. If your minis are not fresh from the factory, you have probably either been playing your games or fondling them while reading about them online. The oils from your fingers now coat the miniature, and paint won't adhere to that either, so wash it!
2. Primer
The inital coat of paint should be a spraypaint primer. You want to get a can marked "flat" so it isn't shiny or glossy. Go for the basic stuff, don't try any of that "bonds to plastic" spraypaint unless you want to watch frodo's face melt off. Don't get "rust tough" unless you want Frodo's face to look like look like he was stung by 1,000 bees. I go for Krylon Flat Black Spraypaint. Not semi-flat, but flat or extra flat if you can find it. Cheap and easy, like Steve Avery.
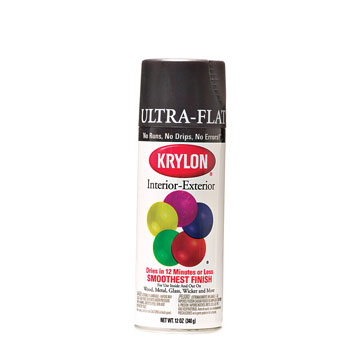
First, a discussion of color. This is a much debated issue amongst painter geeks. Some swear by white, others always prime black, some prime all the colors of the rainbow. I am a "prime black" guy. My reasons are simple: any spot I miss with paint later will appear like a shadow. In effect, priming black does some of the shading work for me. It is the ultimate lazy ass painting tool. It also makes colors less bright and lends itself better to the sci-fi and fantasy themed stuff, which looks good dark and gothic. If I was painting Dora the Explorer, or the BGN action figure set, or Barney, I would prime white for the brighter, happier look.
I would only recommend colored spraypaints if you are going to do a lot of models in a one-color scheme. For example, if you are doing your DOOM demons and they are all going to be based off of a dark red, you might want to consider priming them that color. I'm still not a big fan of colored priming, because it just results in more time spent doing shading and details which happen naturally with a black primer.
The technique you are looking for with the spraypaint is a thin, even coat. Not enough paint and you will have spotted dudes. Too much and you will obscure the detail. Shake the can up well. The five minutes of shaking suggested on many spray cans is a minimum. The arm workout will make you look even more impressive when you wear your tanktop to gaming conventions. Spray in an area with low humidity and not much dust floating around. Keep the can around 6 inches from the minis. I like to place the minis on a shoebox lid or piece of cardboard and move the minis instead of the spray can.
3. Base Coats of Paint
Okay, your dudes are primed and ready to go. First, I want to talk about what paint to buy. Nearly everyone uses acrylic paint, because it is easy to remove if you screw up and can be thinned with water. There are basically two schools of thought on what brands to buy. Many people swear by expensive miniature paints. Citadel (games workshop), Tamiya, and Vallejo game color paints are the top brands. Citadel's foundation line is especially high quality, and is the best model paint you can get in my opionion. You can find these in miniatures game stores, train hobby shops, and some regular hobby shops. Once in a while they will show up at a craft store. The only paints where I really consider the expensive stuff are metallics and inks.
The other option is to buy craft paints and thin them down. Craft paints are a lot cheaper, but require some thinning down for use on miniatures. You can thin them with straight water or with a mixture of clear acrylic floor cleaner and water. I know some people that go for Apple Barrel brand, which is the cheapest crap wal-mart has to offer. I prefer delta ceramcoat, which is available at some walmarts and nearly all craft stores. They are still way cheaper than Citadel or Vallejo, but look a lot better than Apple Barrel and some of the other crap out there.
You want your paint to be thin. If you buy paint designed for models, like Citadel, you may not need to thin it, but if you go for the cheaper craft paints, you need to think them down because they are too thick. You can do this with straight water, or if you want a little better results you can use a flow extender product. There are several miniatures specific flow extenders out there, but the best thing I have found is actually floor polish called Future. 
This stuff is miniatures painting gold. It is basically a clear acrylic paint mixed with a substance that destroys the surface tension of water. This makes it ideal for clear coating miniatures and thinning paints. Johnson & Johnson probably sells more of it to mini fanatics than they do as a floor wax. I mix 80% water and 20% Future and keep it in a water bottle. That substance gets used to thin my paints down, clear coat stuff, and create inks (discussed later). Like I said, 95% of my paints are Delta Ceramcoat cheapos from Michael's craft store. I use an old egg carton as my paint mixing station and with a squirt of delta and 10-20 drops of my future and water mixture, it creates a paint that is just as good or better than the incredibly expensive modeling paints people buy.
Once you've got the paint you want, you need to apply it. Get soft bristled, small brushes. The size you need depends on what you need to paint. I am a big fan of sable hair brushes, but I also have some synthetics I use.
It is tough to describe the proper technique. Practice makes perfect. You want to apply thin layers of even paint to the minuture. You might need to do more than one coat, that is no big deal. Try not to get too much paint on the brush, and apply short, even strokes in the same direction when possible. Paint from the inside out. Skin first, then clothes, then armor, then weapons. This will let you cover up mistakes without having to go back, although that isn't a big deal if it happens. Honestly what seems like a big mistake will probably be totally unnoticable once you are finished and especially once you look at the miniature in a group of minis.
A big part of the base coats of paint is just planning what you are going to do. Planning makes it easy, like paint by numbers. That also lets you assembly line paint the minis. Paint all the horses brown one day. The next day you go back and do the rider's pants. This method is slightly more repetitive, but much much faster than painting individual models. Painting one individual as a test dude is pretty common practice though, mostly to be sure you like your paint-by-numbers scheme's end result before you paint everyone that way.
4. Details
This is the part that tends to scare people. Anyone can do steps 1-3 and be looking good. The details on your model will turn a basic color by numbers scheme into an actual piece of art. If you stick to the easy techniques I describe here, adding details to your miniature can be easy, fast, and look good too.
 Drybrushing. This is the easiest technique there is, and has been my "go to" highlight since I started painting. Load your brush up with a lot of paint, then wipe it off on a napkin or newspaper. You will be left with a bunch of wet bristles. Now you rub the bristles of the brush roughly over the surface of the model. YES, this is as easy as it sounds. Your brush will deposit paint sort of randomly over the flat surfaces and will also deposit a lot of paint on any raised details. This will give the flat surfaces a weathered look, and will give the raised details lots of paint.
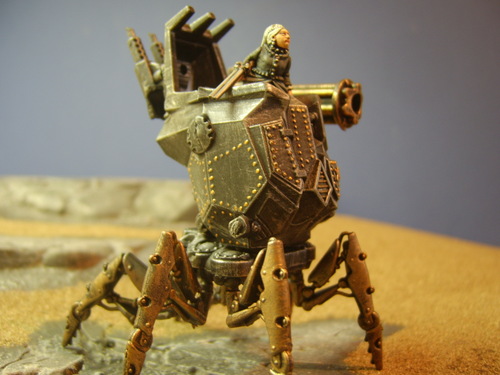
Choose your drybrush color wisely. The mini above went with a totally different shad to show weathering. Often you will want to do a slightly lighter version of the color you are drybrushing over. If you are doing a gun, I paint it black then drybrush it with a metallic. For hair, you can paint it brown and drybrush to add grey or do a lighter brown to bring out the 3D depth. For bones, tusks, and similar stuff, I will paint them light brown then gradually drybrush up the length of the bone with successively lighter colors going from bone to white. That is probably more detail than you need, but it gives you an example of things people do with drybrushing.
The model to the left was in the top images on boardgamegeek. It looks like the painter painted the rivets individually, then went over and drybrushed the whole model to add some weathering. You can also see where he drybrushed the edges of the armor plates, which brings out the detail edges and makes the corners look more weathered than the flat areas.
Drybrushing is also great for painting metals. Leave swords and guns black, then drybrush on metallic colors. This comes out wonderful, and avoids the super-shiny-sword-syndrome you see on so many models. Chain mail, dragon scales, and textures like hair also really benefit from drybrushing. The raised areas get a little more color than the recesses and it comes out looking very natural.
Inking. Take your black paint and water it down a lot with Future/water mix until you can see through it. What you have is a black ink. It is so watery, it will flow into the recesses of the model and provide additional shading. Because it flows naturally to the low areas, it comes out looking nicely 3D. You can also use it to cover entire models with a semi-transparent shade. Brown ink on metals looks like rust. Flowing into the low areas makes them look more rusty and comes out very natural. Dark Red ink over an entire red model (like a demon or dragon) followed by a black ink for shadinng is a fast way to turn a red spray painted model into an instantly finished model.
Check out the ink job on this dude. Black ink has given him a dirty look, and you can see where it ran into the recesses between the ropes on his chest. They black inked his face then followed that up with drybrushing a lighter flesh tone and it looks pretty good. Black ink running into the little details under his kneecaps were probably the only viable way to get any color into those.
Inking is just about the only way someone as unartistic as me can get a face to look OK.
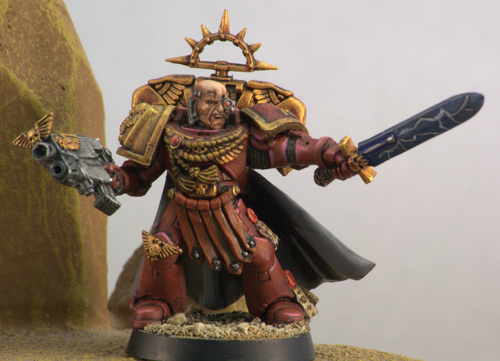
Highlighting/Edging. This is probably the most difficult detail technique I will discuss here. Basically, you take a slightly lighter shade of paint than your base coat and freehand it onto the high areas on the model. It needs to be very slightly lighter. Sometimes I use a series of progressively lighter highlights. You can see a little pink paint used to highlight the space marine's shoes and his sword arm on the above model. Some brighter gold highlights were used on his backpack too.
5. Basing
If there is one stupidly easy technique that will make your miniatures look 1000% better, it is proper basing. Elmer's glue + little rocks + sand all around your dude's feet makes a huge huge difference. Something about the completeness of it tricks the human eye into ignoring paint problems and seeing the mini as a whole and it will really improve how your stuff looks. It is also very easy.
Coat the base in elmer's glue - just thick enough to be opaque. I use a toothpick to move it around. Stick whatever stuff you want on. Let it dry. Drybrush it with a little paint if you are feeling saucy. It is that easy. I am a big fan of sand and kitty litter for fake rocks. If my wife has bought the grey kitty litter, I drybrush it tan and that comes out really well. I've bought static grass and even fake snow and glued those on, they look good too. You can find that stuff in model train stores or online for reasonable prices. Pebbles or rocks from outside work. Smash them with a hammer if they are too big. Some folks use aquarium plants.
6. Sealing and Storage
I am not a huge believer in sealing your minis. Too many sealers on the market alter the look of your paintjob. Besides, it isn't like you are playing crokinole with these, if you are careful with them your paints won't come loose anyway. If you do want to use a sealer, I recommend Testors Dullcoat matte sealant. You want to look for a matte sealant because non-matte will make your stuff shiny. I prefer just to be careful with my stuff and store it well, and I have minis that are 10+ years old and have never been repainted and show no chipping.
For storage, get some sort of soft foam. Plano boxes plus soft foam or cotton batting does the trick for small miniatures. For bigger stuff, a cheap solution is egg crate bedding foam. Place the pieces of foam so the top is slightly offset from the bottom and doesn't match exactly. If they match up too closely, they will crush your figures. Walmart's fishing section is a great place to get cheap plano boxes and the craft section of walmart sells a soft foam you can cut up and stick in the boxes.
Conclusion
Painting miniatures is not as hard as people think. It can be a little time consuming but if you plan it right and don't try to create a Golden Demon Winner with every piece, you can really pimp out your games. Sticking to simple fast techniques and using cheap materials can result in pretty good stuff. With so many excellent minis on the market, games that don't even have them can be pimped out. If people enjoy this article and are interested in this topic, I might buy some pulp era figs and paint them for my Arkham Horror set and do a step by step. If you would be interested in reading that, let me know in the comments.
ADDENDUM:
Screw Ups
Forgot to include this when I initially posted the article, but this is good information. Stripping miniatures you have screwed up is tough when they are plastic. I love to use metal minis as test miniatures for this reason. You can strip a metal miniature with good old paint thinner and water.
If you screw up a plastic mini, or your test miniature looks like crap, the best way to strip it is the cleaning product Simple Green. Most paint thinners will melt frodo's face off. Simple Green also does this, but for some reason it is a lot slower. This lets you soak a mini for a few hours and pull it out and try to get the paint off with an old toothbrush. Other than painting over stuff (which obscures detail) Simple Green is about as good as it gets.
 Games
Games How to resolve AdBlock issue?