 How to resolve AdBlock issue?


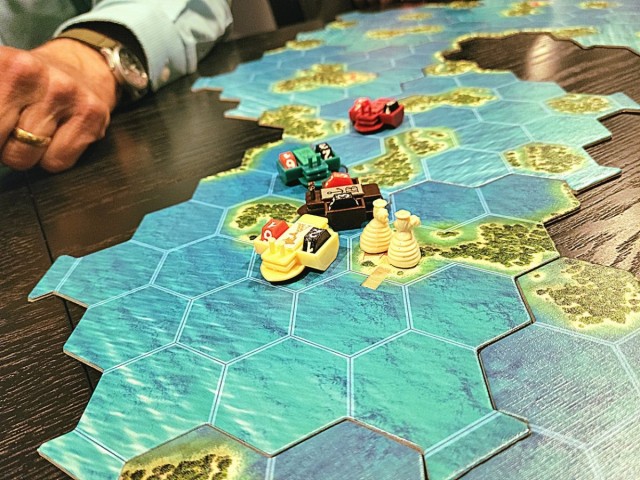


I just played an excellent solo scenario of Strike Them a Blow! in Grant Takes Command. I bought it a few weeks ago and have been playing it quite a bit, finally starting to have the ideas of Great Campaigns of the American Civil War (GCACW) mesh.
The Union won a number of initiatives to begin. As a result, the game started off with Hancock getting an excellent start--this was a sign of things to come from him. As historically, he went wide around the Mattopony river, exhausting himself and his corps before ending up far distant in Chester Depot with his units straggling behind him.
The rest of the Union army tried to swing tighter by crossing the Mattopony at Stannard's Mill and getting in the way of Lee's withdrawal. The overall Union strategy was to allow Hancock to wreak havoc in the rear while delaying the Rebels at crossroads and fighting defensive battles.
This worked less well than hoped, with much of Wright's division shattered in a massive concentrated assault by a withdrawing Ewell at Mitchell's store. The planned roadblock through the middle of the map was now mostly gone. Lee and Hill quickly withdrew from his fortifications at Spotsylvania without incident with a series of won initiatives. They headed south through Wilson's store and Mitchell's store. Anderson followed as a rear guard. Burnside gave a slow and blundering chase to Lee and ended up being far outpaced by his superior Confederate commanders. Hancock was now looking very lonely, with Hill and Lee (the heart of the Confederate army) directly to his west and Anderson surrounding him from north of Chester's depot. Anderson guarded the roads into the woods and rough areas north of the North Anna.
Meanwhile, with the Rebels leaving from in front of him, Warren had begun to move. Warren must have been sick or drunk, as he suffered from absolutely miserable rolling and slowly rumbled down the road from Guinea Station and ended up near Lebanon's Church at the end of day 1. Hardly the surge or flank maneuver needed to beat Lee to Chester Depot and support Hancock.
Throughout day 2, Hancock looked in big trouble, with his units strung out in the woods at and to the west of Chester depot and almost surrounded. In response, he received multiple activations at the end of day 2 and all day 3 and went on an epic flank maneuver across Littlepage Bridge. Lee and Hood split their troops, one unit to protect the crossings of the north Anna around Oxford Ford from Burnside and what was left of Wright's division and the other to chase a now active Hancock.
Wright and Burnside lost thousands of stragglers to hard marching down the roads in the West, tracing the route of Ewell and Lee. They nipped at the heels of but never managed to either catch Ewell, inflict a defeat or take any objective areas on the other side of the North Anna.
Anderson settled in and entrenched, protecting any entry toward Chester's depot. On days 2 and 3, Warren's corps attempted to force a crossing of the road entry to the woods near Chester Depot and repeatedly failed. Eventually, by the end of day 3, Warren barely ended up next to Chester depot with Anderson holding Chester depot itself. He was vulnerable to a nasty counterattack, should the Rebels have desired it.
Most of the action was around Hancock, who crossed the bridge and took Hanover Depot well the south of the main objectives. As rear guard, Tyler then unexpectedly repulsed a flank attack from the North near Goldeby by Hill and Heth. Across the North Anna, this left Birney and Barlow to maul Pickett at Wieckham and then Ashland. They took both.
Nevertheless, the surrounding action from Hancock had come to naught. By the end of day 3, The Confederates held almost all the crossing they needed to. Casualties from combat were relatively close, with the Union losing 15SP and the Confederates losing 11SP.
Result:
Substantive Rebel Victory (17VP)
LVP (Rebs, Union)
Wilcox, Burnside
MVPs (Rebs, Union)
Ewell, Hancock
Lessons learned:
1) Be incredibly wary of separating your units of the same command from each other, especially as the Union. You really need whole divisions together. I had a couple of straggler units (one of Hill's, Warrens, and Hancock's) that got left on their own and were slowed down considerably for and never got into a great position. Units on their own are also very vulnerable to counter attacks.
2) Fatigue is absolutely grim, especially on Union commanders, when units are exhausted. You can never really hope, nor should you perhaps try, to chase down any Rebel commanders over multiple days. You simply will not be able to do it and will lose many, many SP, as I did, to extended march rolls. For the Union especially, not pushing your units too hard is definitely to your advantage.
3) Grant Takes Command has an amazing variety of scenarios and the GCACW series is extremely dynamic!
- Member Blogs
- Lee Escapes with Ease AAR from Grant Takes Command
Lee Escapes with Ease AAR from Grant Takes Command
Hot
GS
Gary Sax
Updated
6087
0
Game Information
Game Name
There Will Be Games


Discuss this article
Log in to comment