In full retreat
 So, Badger was round last Friday for our regular Combat Commander session, which we had carefully planned to make sure we’d have time for 2 games. Committed as we are to playing all the official GMT scenarios at least once, we turned again to Battle Pack #4: New Guinea for Scenario M4. Templeton’s Crossing. This is a time and place we've visited before: Scenario G. Bitter Creek from Combat Commander: Pacific is similarly set around Eora Creek in October 1942, when the Japanese were fighting to withdraw their overstretched expeditionary forces back up the Kokoda Trail.

 The battles of October and November 1942 in Papua New Guinea were the last phase of a campaign which had begun in July of that year when the Japanese landed on the north coast of the southern end of the island of Papua. Their objective was Port Moresby on the coast some 150km to the southwest, from where they planned to launch an invasion of Australia. To reach Port Moresby the Japanese had to cross the Owen Stanley Range, which rises to over 3000m. The Kokoda Trail was essentially the only route suitable for military forces and the Japanese troops spent 2 months struggling through jungle and across ravines as the Australians fought a series of delaying actions to save Port Moresby. Eventually the Japanese fell foul of the perennial problem of over-extended supply lines and were then forced on the defensive as their strategic position in the Pacific was undermined by the Americans’ early gains on Guadalcanal.
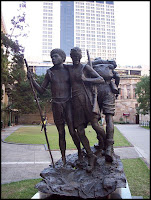 The terrain on the Kokoda Trail was some of the toughest encountered in the Pacific Theatre of Operations, adding its own challenges to the already arduous trials of jungle warfare. Alongside the desperate efforts to halt the Japanese advance and stave off the threat to Australia itself, these infamous qualities- and their effects on the soldiery, have served to make the Kokoda Trail campaign legendary in Australian memory, an essential feature of the country’s historical mythology of the Second World War.
A ragtag bunch: scenario and set up
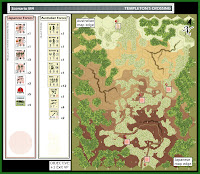
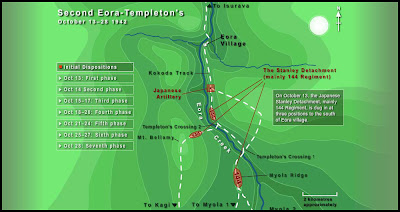
Scenario M4 represents one of the attempts to outflank the positions of the forces of the Japanese delaying actions. Determination or otherwise, my mood was certainly grim as I tried to figure out how to set up my puny 3 squads and 2 teams to deal with Badger’s impressive force of 12 rock hard ANZAC squads. Although I had enough foxholes for decent cover, the situation was further complicated by the fact that all that green terrain represented jungle, which would give Badger plenty of cover, and dead ground to boot. I drew a random objective making Objective 3- the northernmost, worth 3VP. I figured though that trying to hold onto that objective would be futile and would just give Badger some free casualty VP.
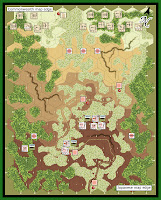 In the end my plan was simple and unimaginative. I set up most of my units to hold the highest-level ridge line to lay down as much OpFire as I could while Badger’s units moved up. These positions would enable me to maximise my use of height advantage as the ANZACs approached. My remaining team was on the left flank so that Badger didn’t have a free run through that jungle. I knew the risks I faced with this setup:
- My squads and LMGs were outranged by Badger’s, so he could do some serious damage before I had a chance to respond.
- Badger wouldn’t have to do much damage significantly to reduce my forces, giving him a good opportunity to turn one of my flanks and go for the exit VP which would probably prove decisive.
My Sighting markers were set up with 2 things in mind:
- Melee- unlikely because Badger would counterattack with a killer overstack and just stomp me even if I won the first round; simply too dangerous seriously to consider then.
- Exit VP- risky because I’d open a gap in my own lines which Badger might be able to exploit to his own advantage, thus rendering my own manoeuvre worse than pointless; still, this looked like my best hope of using the Sighting markers to good effect in this game, especially with the bonus exit VP objective in play.
Badger's setup was similarly straigtforward- 3 manoeuvre groups, one for each leader. Note that he made the mistake of setting up a squad out of command in the northwest corner of map. This squad still managed to be of some consequence.
The attack develops
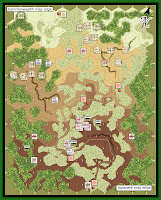 The game started- as games of CC:P so often do, with early Asset Requests. Badger’s resulted in Artillery Denied, to his chagrin. For my part, I got a 75mm radio. Badger was relieved that it wasn’t any bigger. My LMGs sniped at Badger’s units as they moved forward. The scenario's special rules for weapon breakdown saw the Initiative card fly backwards and forwards across the table with unprecedented frequency as we each sought to keep our weapons functioning. Luck was almost bound to swing one way or another sooner or later, so that I had 2 broken LMGs by Time 2. Meanwhile, my forward units had suffered exactly as I had feared: Sgt. Konoboru lost both his squad and his team to enemy fire. Fortunately I was able to save a team from the squad using the Light Wounds action. I regrouped my other forward squad into Konoburo’s hex to maintain my firebase.
Other strokes of good fortune in the early game were:
- I got a B Division squad as reinforcements, although it hadn’t moved off my map edge by Time 2.
- I was able to eliminate Badger’s HMG with 2 Asset Denied cards, which really took the pressure off my own firebase.
- A Recon event revealed Badger’s secret objective to be OBJ 5=3VP, points which were handy for me to know about so early in the game.
- There were no dice-roll time triggers as we ran through our first decks, so time was favouring Badger thus far.
 My previous good fortune notwithstanding, Badger’s attack continued to make strong progress in the third time period:
- His flanking manoeuvre groups continued to grind forward towards my weakened ridge line defences in the centre.
- The attrition of my central defences continued:
- I had to Advance a broken team out of LOS to save it from Badger’s firebase.
- Meanwhile, my reinforcement unit arrived just in time to replace another squad which Badger had eliminated.
Badger’s luck was rounded off with a Reinforcements event, for which he chose a Colonial squad, placing it on his objective on his map edge.
I thought I’d had a stroke of good luck when a Walking Wounded event forced Badger to bring back one of my eliminated teams, but it ended up deep behind his lines. I can’t remember exactly what happened to this unit, but it certainly played no significant part in the game. It was soon eliminated, probably by the isolated ANZAC squad adjacent to which it had landed. I also received Air Support, which arrived in a location well placed to attack Badger’s main firebase.

The 4th time period was quite uneventful, no doubt because there was an early dice time trigger. Badger continued his move up his left flank, while I was able to lay down some effective fire on his units. And Badger hit me with Abort Run to remove my air support. And that was the situation as we entered the decisive endgame.
A brutal and bloody surprise ending
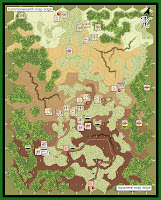 I used the scenario’s special Infiltration rule to redeploy Sgt. Endo and his squad to my eastern sighting marker to head off Badger’s eastern flanking force as it worked its way through the jungle. Meanwhile Badger had clearly decided that he was on a hiding to nothing trying to work his way off the map through the jungle on the flanks because the 5th time period saw both his flank forces close in on my central defensive position. I was able to lay down astonishingly successful OpFire even though I only had a 1-command leader, a 4FP squad and an additional team: by the 5th time trigger Badger's best leader and fully 6 out of 7 of his squads were broken, while another had been eliminated by a KIA event. Seeing that Badger wasn’t going down the eastern flank after all, and in a move which was to prove decisive, I regrouped Sgt. Endo and his squad with the team which had been hanging around on that flank since the start of the game.
 The 6th time period was both quiet and tense: quiet- because all that happened was that Badger’s eastern flanking force Advanced towards the inviting gap between my 2 remaining stacks; tense- because there were only 2 time triggers left and, his many broken units notwithstanding, Badger was well placed to finish me off with an overstacked melee in the centre and a dash for exit VP through that gap. Although I was in a position to finish Badger off in melee myself the cards just didn’t fall for me, so I just had to sit and hope that everything didn’t fall apart in the face of Badger pulling everything together.
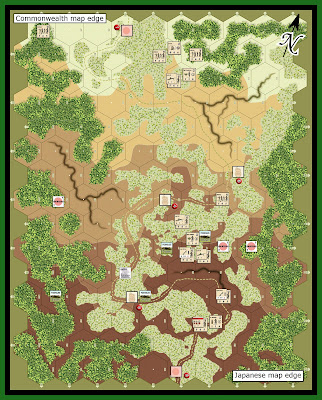
The last time period was where it all kicked off. Badger started Reviving his units and forming up to launch exactly the melee attack that had been worrying me. I Advanced out of range, but that was only going to delay the inevitable unless I was very lucky. Sitting with an Infiltrate in my hand, I decided it was time: Sgt. Endo and his units redeployed right up to the northernmost Sighting marker, which had been sitting on the jungle/trail hex D6 since set up. Meanwhile Badger’s eastern force began its dash through the gap, heading for the trail that’d speed its exit off the map. We were now into a race:
- Endo and his lads charged down the trail, taking fire from the isolated ANZACs and the Colonial squad as they did so- they broke but were still fit to pile in to take the Colonial squad apart in melee.
- Badger’s exit force ran for all they were worth.
- Badger’s assault force did for Sgt. Konoburo and his lads in melee- this proved to be ill-timed.
- Endo and his units exited for 12VP, and suddenly I had no units on the map.
What to do? We checked the rules and, sure enough, because my last units had exited the map for VP, the game was over and I hadn't lost instantly, so it was a VP count, which was 12 to me. I’d won. Whew!
Afterthoughts
 What a game! I never felt able to relax, even when I had something to celebrate, like the 5th time period’s awesome bout of OpFire. It was also really strange playing a game with the Japanese in which I didn’t feel able to use their familiar melee ability to intimidate my opponent. In fact I had so few units left by the time Badger’s ANZACs had closed in that I was intimidated by the prospect of them meleeing me. And the manner of my victory- which was a first for me, was quite unexpected. I mean to say: I’d had the idea of redeploying to those northern Sighting markers for the sake of exit VP- that was why they were there after all. But I never really thought it’d be viable. And I was expecting them to come on as reinforcements. I’d completely forgotten the rules about ending the game when someone’s last units are removed from the map. If I’d exited first and then Badger had won the melee against Konoburo and his units, the game would have gone the other way. So it was all a bit of an accident of timing really. Still, at least I’m not about to forget those rules again in a hurry! ;)
PS. The tactical maps can be seen full-sized on RD/KA!@blogger.
 Games
Games How to resolve AdBlock issue?
