


 How to resolve AdBlock issue?
 - Posts: 12713
- Thank you received: 8358
×
Bugs: Recent Topics Paging, Uploading Images & Preview (11 Dec 2020)
Recent Topics paging, uploading images and preview bugs require a patch which has not yet been released.
Fields of Fire: Our Encounter with the Mines
Less
More
09 Feb 2009 18:00 #270154
by Gary Sax
Fields of Fire: Our Encounter with the Mines was created by Gary Sax
This is an AAR of a Fields of Fire...


This is an AAR of a Fields of Fire patrol I just played. It is atypical in that it is a very *uneventful* AAR, I’m afraid. But that’s primarily because my previous patrol was such a mess and I triggered so many contact markers, making future patrols significantly easier. I think that the makers of the game did a bit of a disservice by not having the first mission performed be a combat patrol. Instead, they made it a full on attack. A patrol is much more manageable as it is only a platoon of guys. If you need bigger pictures, follow the links, the big pictures were breaking the blogs section.
I am often missing small rules but now missions are going quickly. This mission was super short, like an hour, but that is rare. In this particular game, I missed the rule that when a platoon HQ does a platoon move, he moves himself as well. I also don’t understand the patrol rules and rewards and haven’t had questions answered about it that are outstanding—I am champing at the bit to figure out what these rules really are. But nevertheless I have a grasp on most of the major rules and can make my own strategies. It’s not a super detailed report ruleswise. You can ask me what is happening mechanics wise if you want and I’d be glad to let you know.
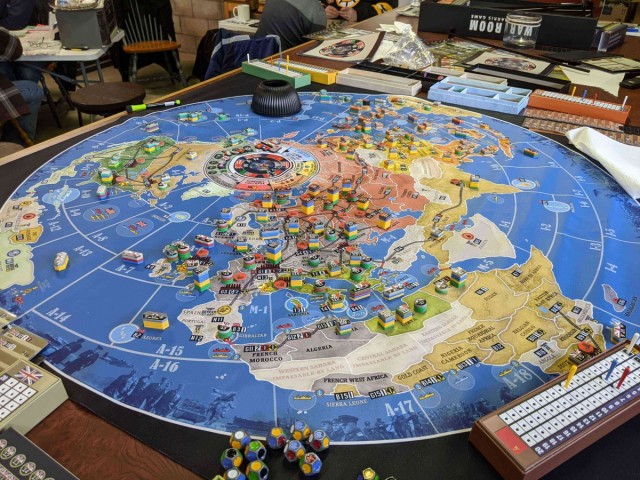
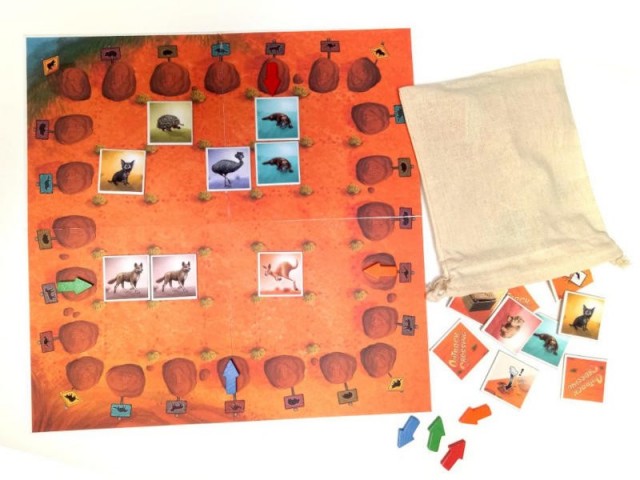
To set the table, here is the map. The mission is combat patrols. I’ll have to run three patrols, with three different platoons to three different spaces in the last row, and then return. So the question is which ones rows to attack and which way to go. Looking at the map, I see a major way of going that has good cover for part of it. It is nighttime, a moderately dark night at that (+3 moon, for the record). No units can see more than one square and they have serious reductions in their firepower.
The village right in front of row 1 (where I will start) is going to be used as my “Combat Outpost” where I can place a platoon (not the one doing the mission) as sort of a forward defensive point. So any patrol will first go through that village square. The real point of danger is then the uncovered area that is next—two orchards and open field, which are murderous terrain if I encounter anything. So I decide to run patrol 1 with my best troops straight up the middle to the village at the back. This was the hard patrol, as I had to clear a number of contact markers on the way to village and then the “A” marker on the village. Future patrols would benefit greatly from platoon 1’s patrol which would encounter the most resistance.
But you are reading an account of patrol 2. Patrol 1 was a moderate disaster. I ran into massive artillery killing 2/3 of a squad. I then took heavy fire from a german LMG in the orchard and then finally got hit with a mortar in the village when I got there. I killed a number of germans (LMG) with my own artillery and managed to drag my units back to my lines by daybreak and turn 10.
Patrol 2 will be much easier. And it was much more uneventful. I need to get to the gully in the back corner of the map via 4 route markers. Luckily I’ve cleared the intervening cards of contact markers so should receive significantly fewer contacts and danger. The only question is the kind of fire I will receive in the gully and if I can get my units extracted from the gully and back home or if they will be pinned there and I will be unable to extract them easily.
So platoon 2, circled, prepares to start its mission at the beginning of turn 1. The platoon HQ has already used his first command to place a “casualty evacuation” point where I will be dragging any casualties I take. You receive experience points for evacuating casualties. The rest of the units in my company are on the map and could fire if they see anything (highly unlikely unless I illuminate something with arty through open fields) but cannot move past row 1.
So we begin. The platoon moves out and pushes forward—I do a platoon move forward to the the village card that has my outpost. We stay in the open (not under the foxholes there) so that the HQ can see everyone easily without going from cover to cover. There is no PC marker so no enemy appear. Platoon HQ had plentiful commands in this mission as there was often no contact and he was never under fire. This is quite uncommon.
On turn 3, we push forward with a platoon order to the orchard card. Again, we have cleared this card so it is unlikely we will encounter anything. So we all jam under the cover (the little blue +1 marker). If we were to be hit by artillery or something we would be totally and completely screwed and all die—if you put too many men under cover explosives do massive damage.
During the enemy phase, something interesting happens. I draw an HQ event. I then pull a random number, check a table and determine that in fact the enemy is shifting his lines backward. 3 German platoons appear behind my objectives, apparently to set up a new line behind the current one. The PC markers (As, the worst kind) are redrawn and are now random ? PC markers.
This brings up how the game works—contact markers. Contact markers are how the enemy is generated. Your troops on a square with a PC markers must check to see if they make contact. The more enemies on the table, the less likely you will get a contact with the enemy. Since there is no contact at the moment, units are appearing in droves when contact is triggered.
Turn 4 begins. Luckily, since it is pitch dark and no units can see more than one card, the enemy units disappear into the night that pulled back. Enemies disappear and become a contact card if they are out of LOS and not firing. If I were to advance past the 4th row I would run into some nasty markers. As it is, the enemy seems to be setting up a line to the rear and I thankfully do not have to run into them. I am now at route 2. So I will make my advance on the gully.
The HQ tells a single rifle squad to get into that gully. He is exposed and vulnerable to fire. Since my HQ is not on the card with him, I cannot tell him to do anything unless I get a hard to get general initiative command. So he is being left out slightly to dry, unable to look for cover, without orders in the open in a gully.
Meanwhile, the HQ, along with all the weapons (light machine gun, a squad, the bazooka team and my artillery observer) move into a building I found and cleared in patrol 1. Squad goes into the lower floors, the HQ into the upper floors along with the specialists. The HQ cannot communicate easily with the people downstairs, but he needs to be upstairs to issue special commands to his special attachments. If the contact spawns a squad, it will probably be in front of the village and we will open fire on it to cover our exposed squad in the gully. I also leave a squad behind in the orchard, just in case.
After moving and ordering, I trigger the PC marker. It turns out to be a C, the weakest kind. Thank god the Germans pulled their lines back, so I can face this instead of an A! I pull a card and check a table—the exposed squad has blundered into a minefield. I then check to see if they trigger the mines. I draw three cards, looking for a burst icon. I get one. God damn it. This won’t be good. Mines are brutal on infantry.
Mines are a -4 modifier. I add the cover modifier of the card (+2, if you look in the upper left corner) but then subtract the exposed modifier (-2, they are running into the card, that will be removed at the end of the turn they move into the card). So I have a -4—the worst modifier, unmodified by the nightfall since the dark doesn’t do anything to explosives! I pull another card and check the table. -4 is a hit. But what happens? I pull another card… it is a C under “line,” which was my squad experience.
This means a casualty. You can see it on the card now. But no enemies were spawned so that is good and the pin goes away from my units who just got hit since they are not under fire now. Turn 5 now starts. We can pull out back to row 1, having scouted out the objective card. But how will I get the squad, which is all alone out of the platoon HQ’s range, out of the way? I could run my platoon leader out of the building into the minefield but then he’s screwed. Maybe I will get some general initiative commands, but you can often be left a few turns without having any general initiative. If I had been smart, I could use a pyrotechnic, but all I programmed before the mission was “cease fire,” “shift fire,” “fire illumination arty” and “advance to objective” pyros. Duh. But first it’s time to try to get the other guys moving back home.
Meanwhile, the platoon HQ tells his specialists in the upper level to fall back behind cover in the orchard. He then rushes downstairs and yells at his squad to head there too. He is now out of commands for the turn (HQs have fewer commands to give at night since it is harder to make oneself understood) so he is forced to stay alone in the downstairs building for now.
I get out of my quandary (do I send the HQ into the mines and die?) by drawing a 2 initiative card—this lets me command any units to do anything, even units who cannot see or hear a leader. So the units in the gully get 2 commands. I give them a “transport” command to pick up the casualties in their square and then their second is to move out of the gully and into the orchard cover with the rest of the squad. Weighed down by their comrades, they get there. I lucked out a little bit.
So turn 6 begins, and all my units save the HQ have moved into the orchard again. Route 3 has been reached. Things get easier from here. Platoon HQ gets plenty more orders and moves out of the lower building to the orchard. He then platoon moves his entire platoon, save himself as he can’t move twice, to head to the village while he remains in the orchard. I don’t draw any friendly or enemy HQ events, thankfully, so things remain quiet.
You see where it’s going from here. This is the beginning of turn 7 after the move. Route 4 is reached. We then move the final step home to row 1, evacuate the casualty and wait out the mission. Not a terrible job all around. One casualty. Completed patrol. Experience points are modest but distributed—my 2nd bazooka team upgrades to vet and one of my other squads becomes line. Lucked out with the Germans falling back, though. So that’s the story of how 2nd platoon met a minefield.
Please Log in or Create an account to join the conversation.
Moderators: Gary Sax
Time to create page: 0.111 seconds